Learn how to knit with DMC. This guide provides step by step diagrams for popular knitting stitches. It's designed to be a companion to our video tutorials which can be viewed here. Use the links below to jump to specific stitches or scroll through them all for inspiration.
Use these links to jump to the steps and diagrams for key stitches.
Slip Knot
Before you begin to knit you must make a foundation row called a cast on. The first stitch of any cast on method is a slip knot.
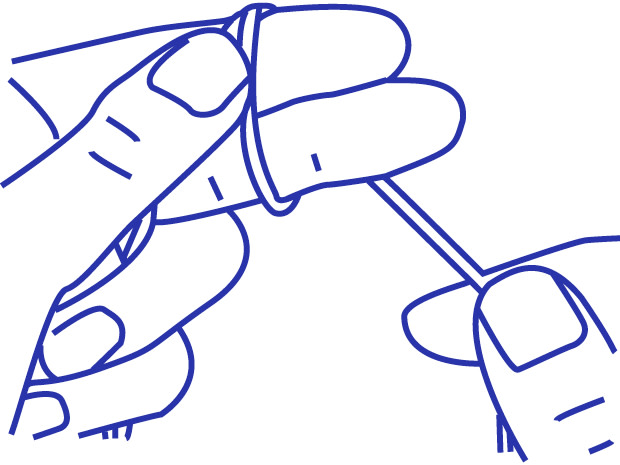
Hold the yarn in your left hand approximately 40 cm (15 1/2”) from the end. Wrap the yarn around two fingers.

Make a loop as shown.

Slip the loop on to a needle and pull it tight.
Hold the yarn in your left hand approximately 40 cm (15 1/2”) from the end. Wrap the yarn around two fingers.
Make a loop as shown.
Slip the loop on to a needle and pull it tight.
Cast on With Two Needles
There are several ways to cast on. This method gives a neat edge.
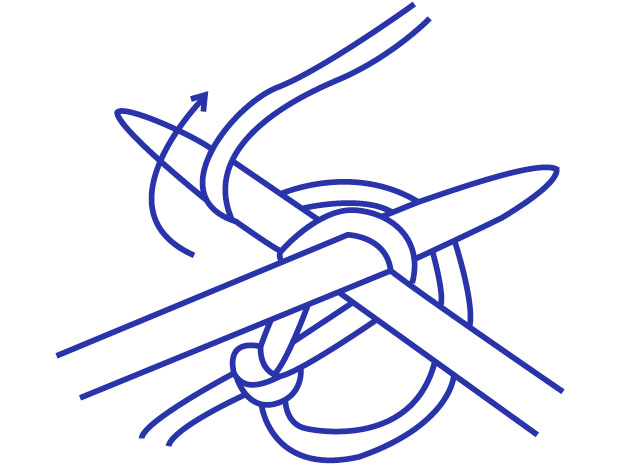
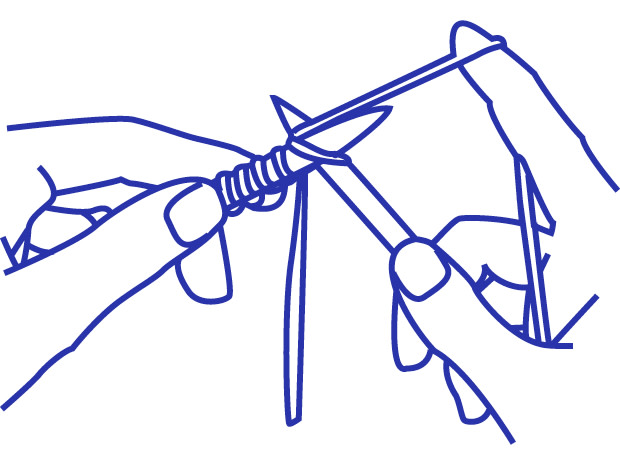
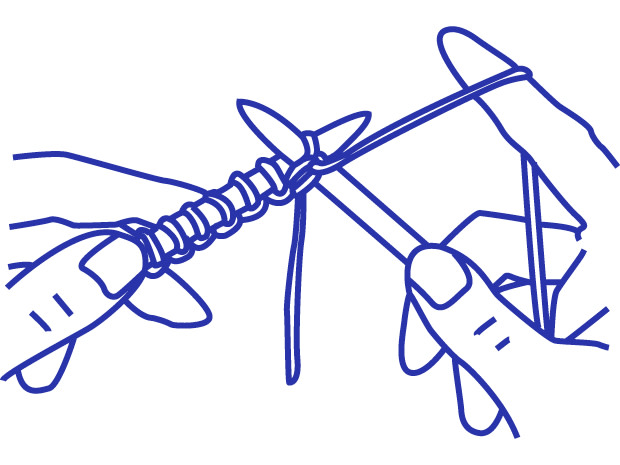
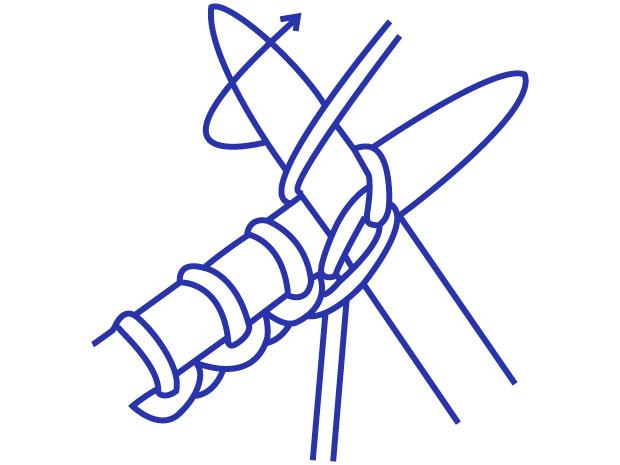
Holding the needle with the slip knot in your left hand, insert the tip of the right hand needle through the slipknot (stitch) so the left needle is crossed over the right needle. Wrap the yarn around the right hand needle.
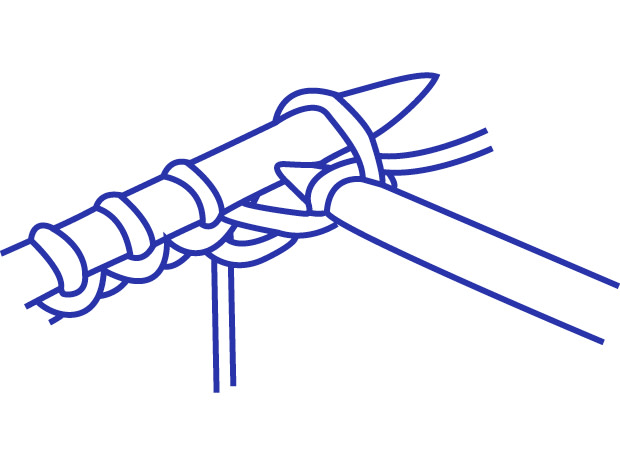
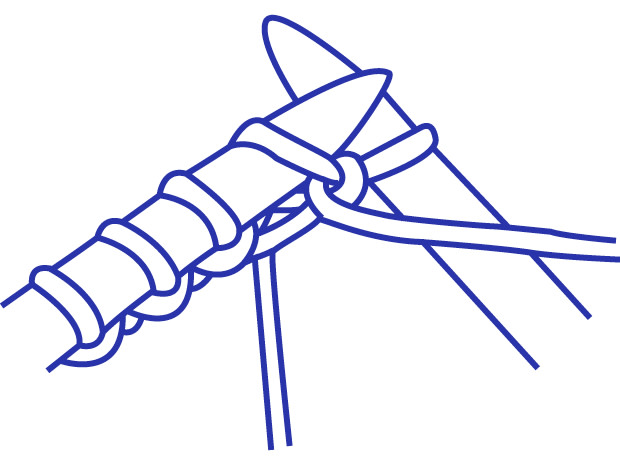
Bring the tip of the right-hand needle under the left hand needle and ‘catch’ the loop on the left needle.

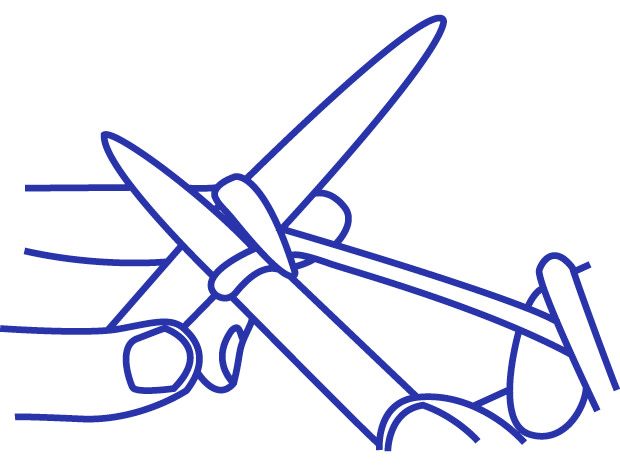
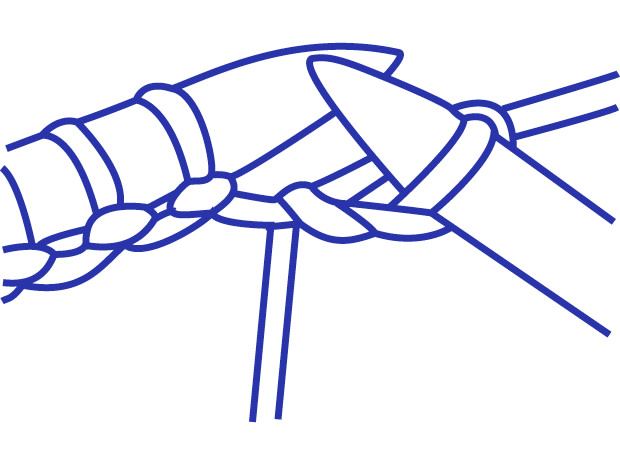
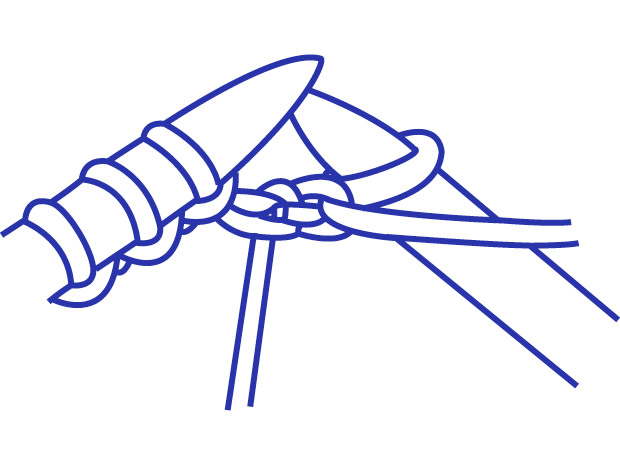
Hold the needles side by side.
Insert the tip of the left needle up the stitch on the right needle and release the right needle. You now have two stitches on the left needle. Repeat steps 1 to 4 until you have the correct number of stitches cast on.
Holding the needle with the slip knot in your left hand, insert the tip of the right hand needle through the slipknot (stitch) so the left needle is crossed over the right needle. Wrap the yarn around the right hand needle.
Bring the tip of the right-hand needle under the left hand needle and ‘catch’ the loop on the left needle.
Hold the needles side by side.
Insert the tip of the left needle up the stitch on the right needle and release the right needle. You now have two stitches on the left needle. Repeat steps 1 to 4 until you have the correct number of stitches cast on.
Knit Stitch
This is the basic knitting stitch.
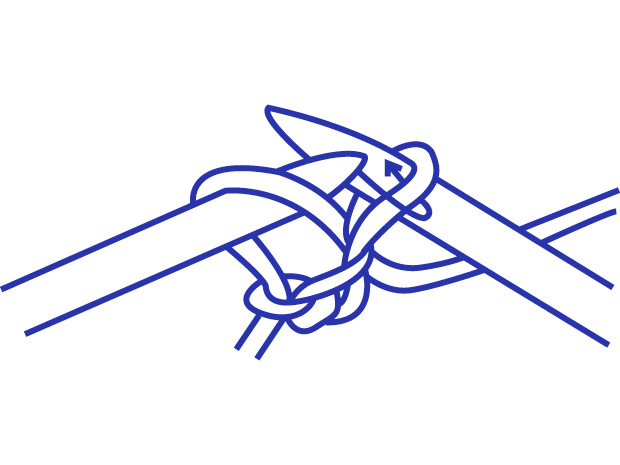
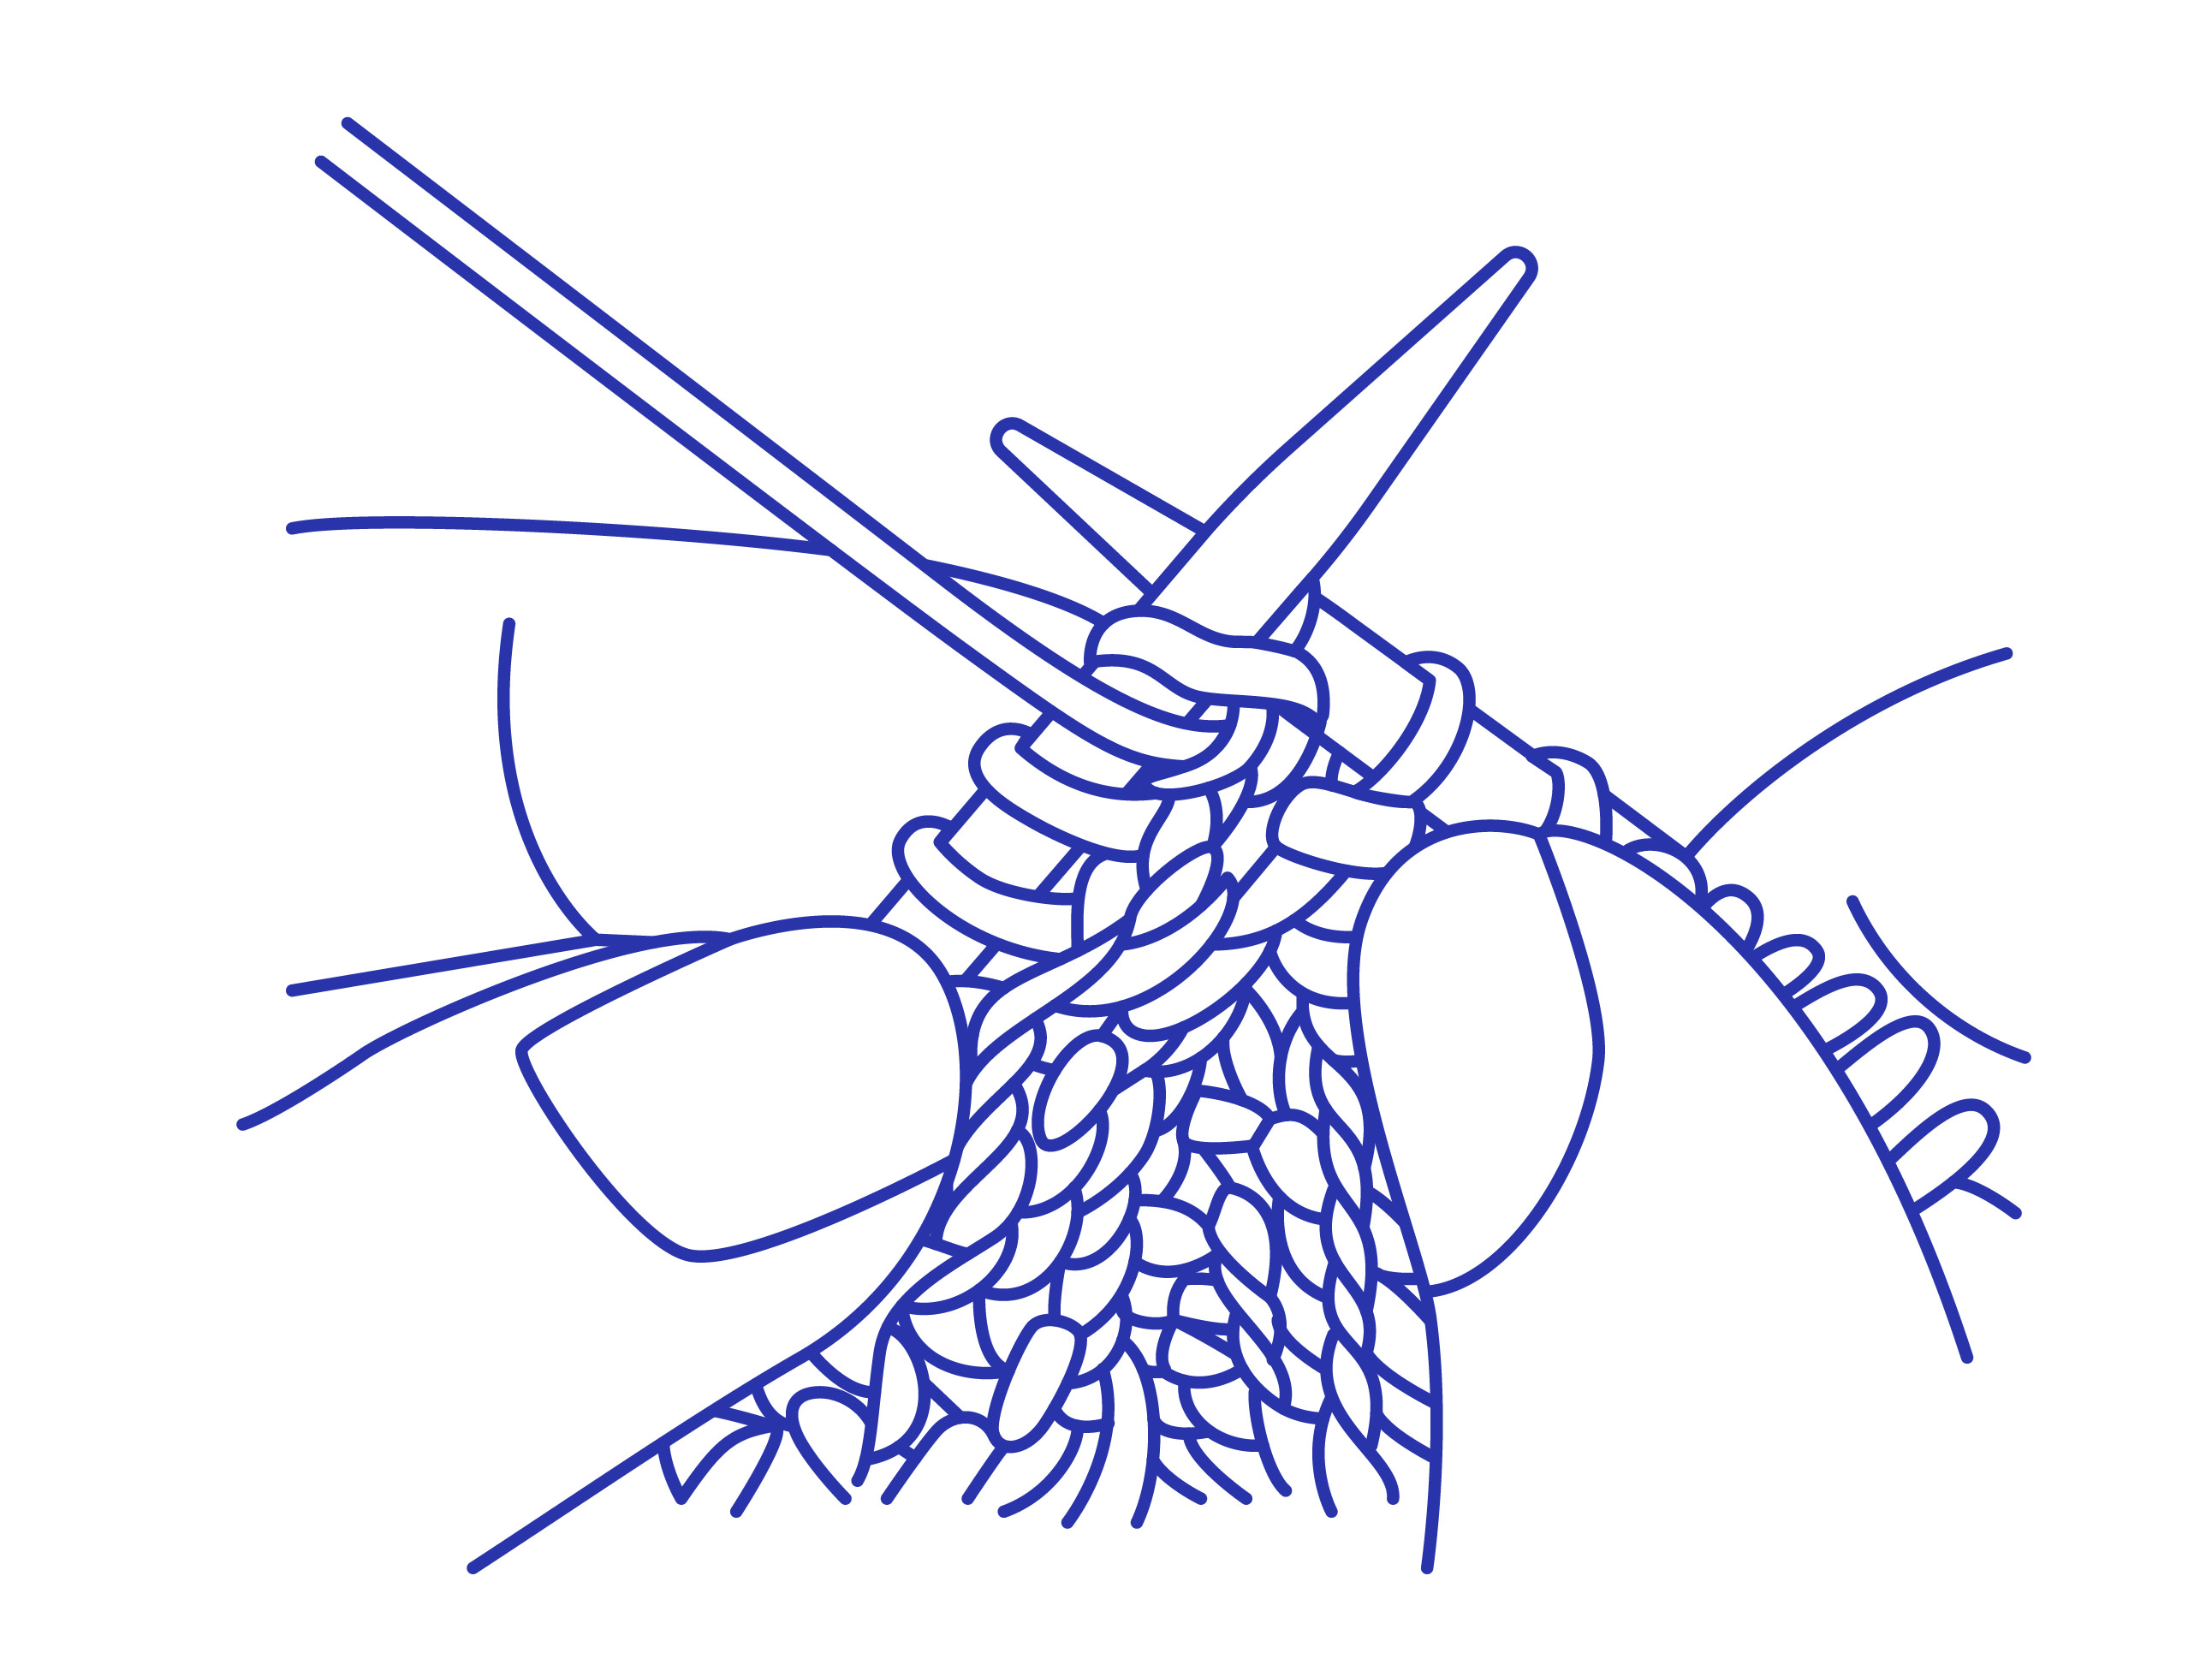
Hold the needle with the stitches in your left hand and the empty needle and ball end of the yarn in your right hand. Insert the tip of the right needle in the first stitch upwards from front to back. The needles will be crossed left over right. With your right hand wrap the yarn from the ball behind the needles and then between the two needles.
Bring the tip of the right needle under the left needle and ‘catch’ the loop.
Slide the stitch off the left needle and on to the right needle. Repeat steps 1 to 3 until all of the stitches are on the right hand needle. Then transfer the needle back into your left hand ready for the next row.
Purl Stitch
When you are using purl stitch, the yarn is in front.
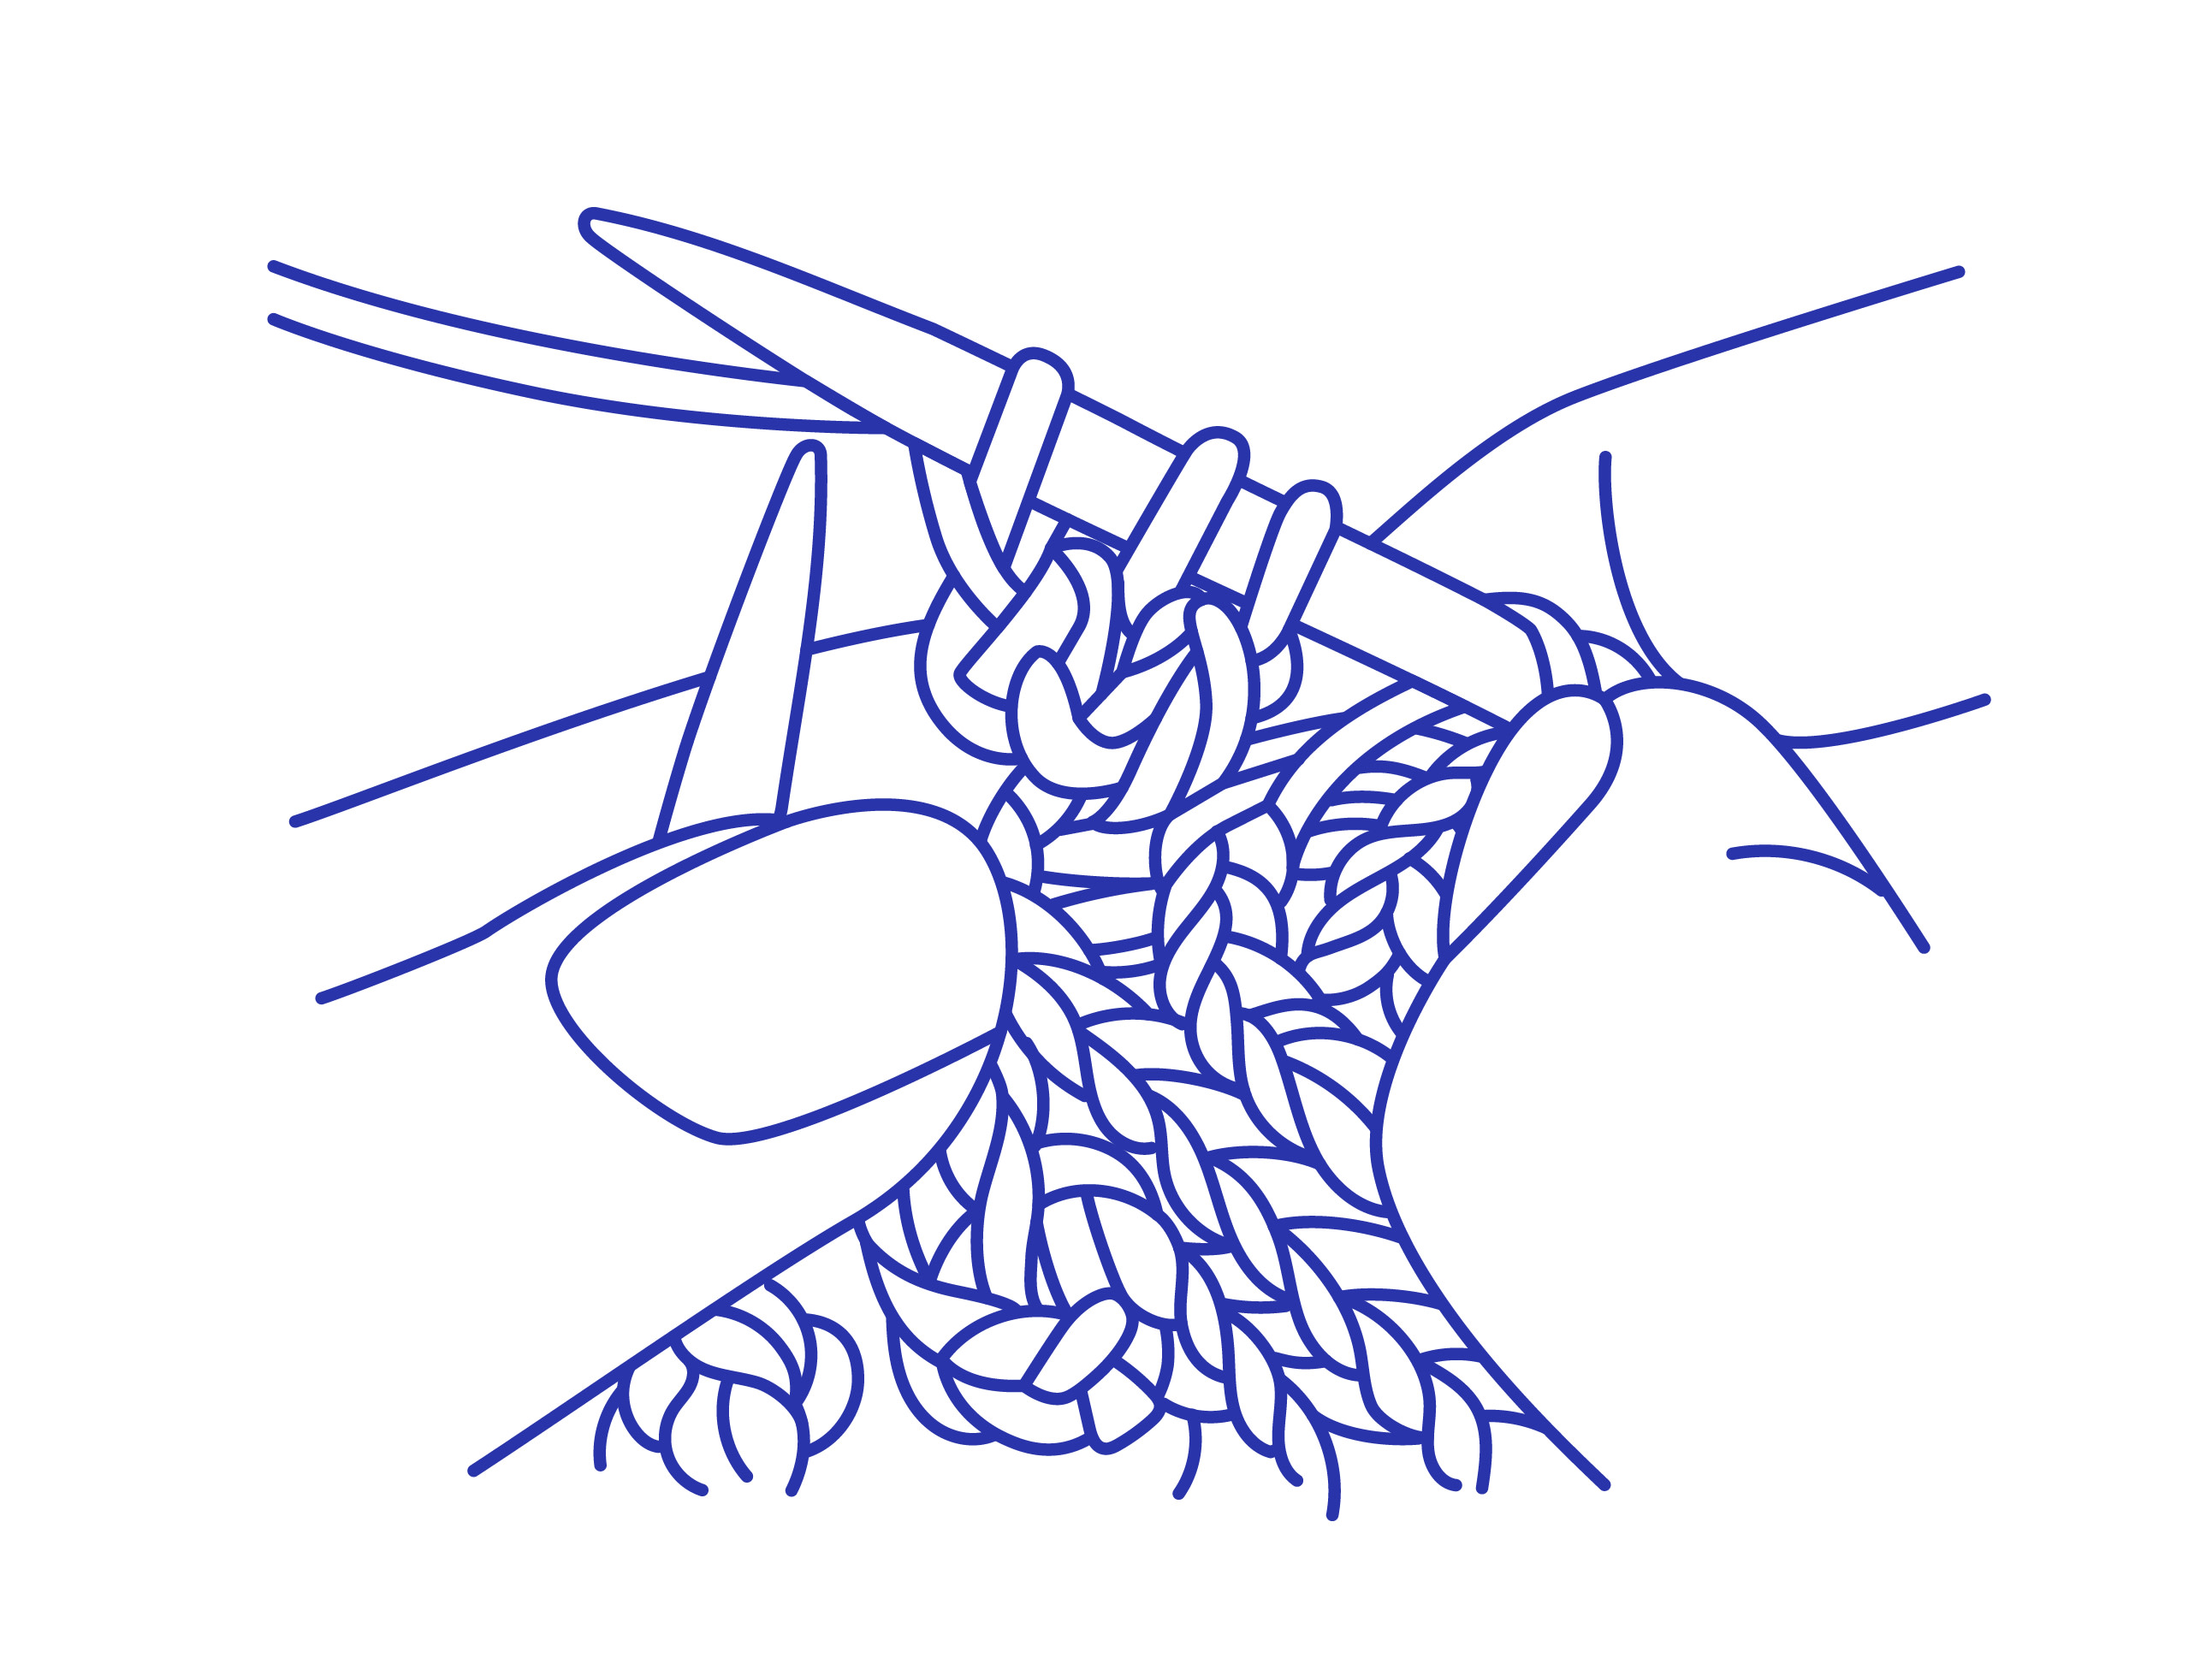
Hold the needle with the stitches in your left hand and the empty needle in your right hand. Insert the tip of the right needle into the first stitch upwards from back to front. The needles will be crossed right over left.
With your right hand pull the yarn to the front of your work then wrap the yarn around the right needle and between the needles back to the front of the needles.
Bring the tip of the right needle under the left needle and catch the ‘loop’ on the way through to the back.
Slide the stitch off the left needle and on to the right needle. Repeat steps 1 to 4 until all of the stitches are on the right hand needle. Then transfer the needle back into your left hand ready for the next row.
Starting a New Ball of Yarn
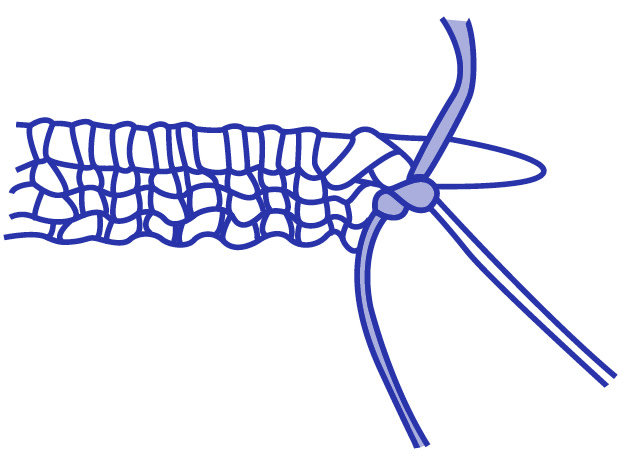
When you come to the end of your ball of yarn, finish the row but leave a tail of at least 30cm/11.5in. With the new ball tie a loose knot on to the tail and slide it up to the needle. Tighten the knot. Continue knitting with the new ball of yarn. When you have finished knitting your project you will weave in the tails.
When you come to the end of your ball of yarn, finish the row but leave a tail of at least 30cm/11.5in. With the new ball tie a loose knot on to the tail and slide it up to the needle. Tighten the knot. Continue knitting with the new ball of yarn. When you have finished knitting your project you will weave in the tails.
Make One (Pick up loop between last & next stitch and knit into the back of the loop)

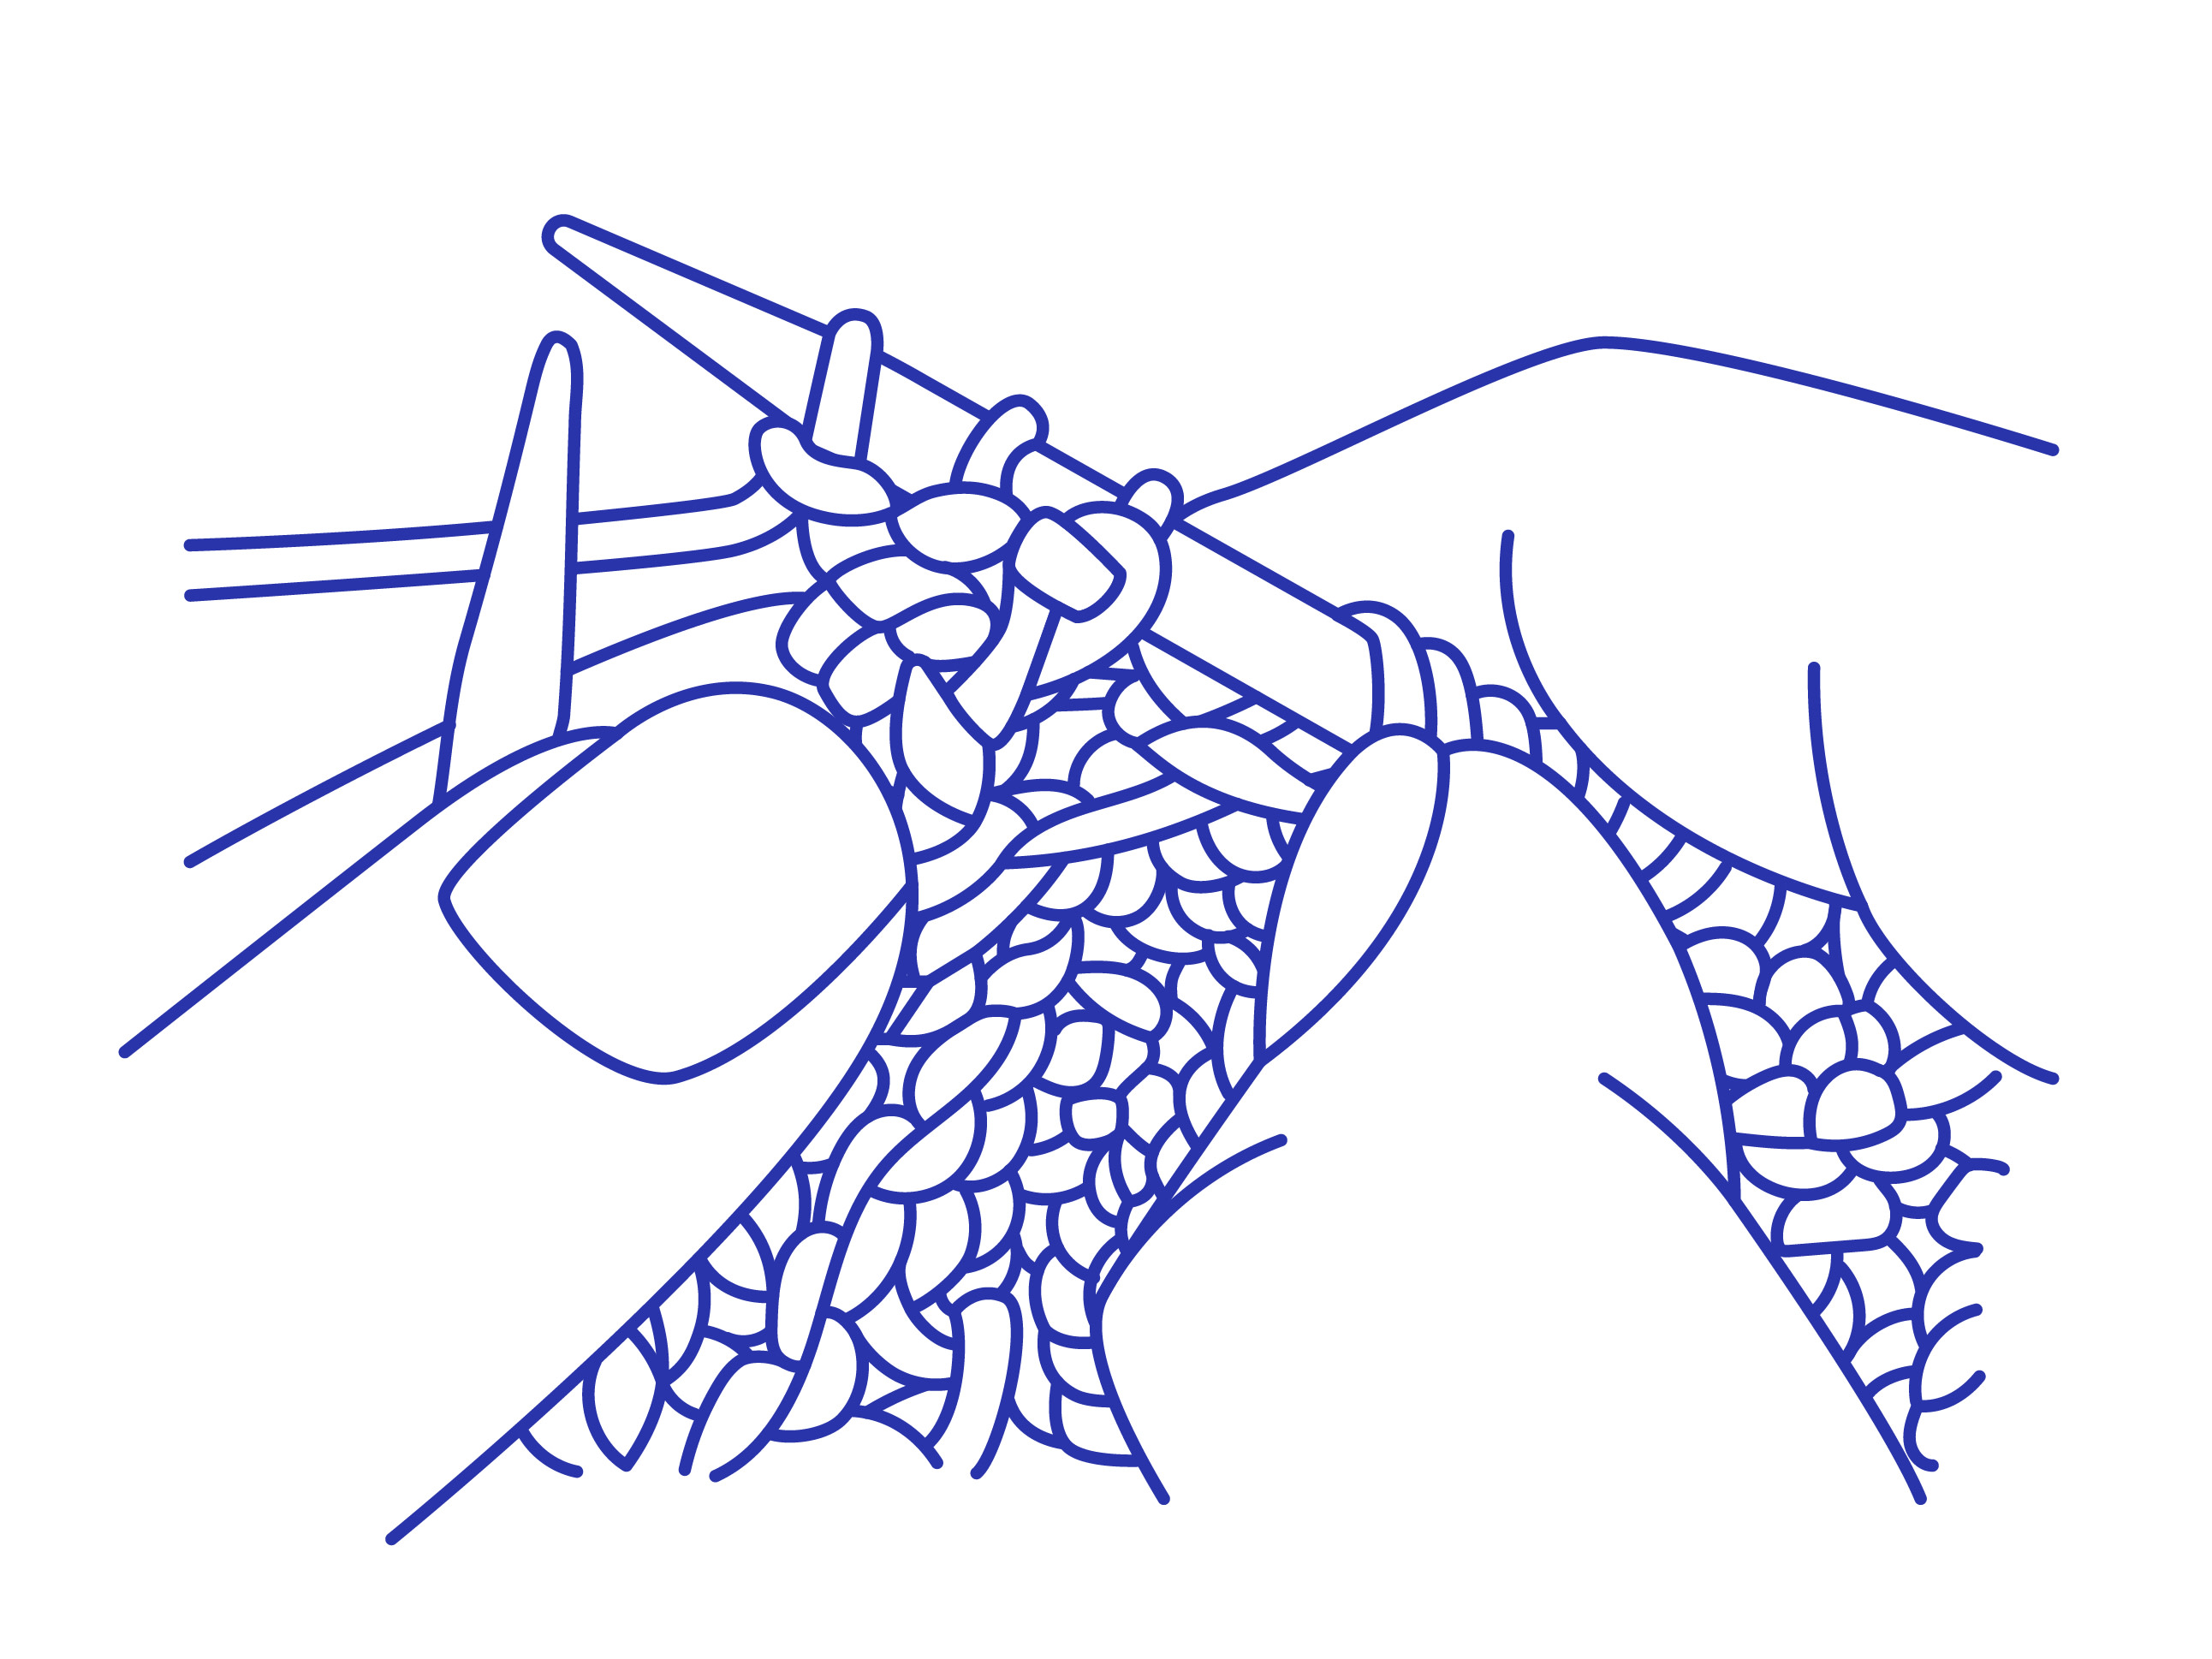
Insert the left-hand needle from front to back, under the horizontal strand of yarn that lies between the stitches and lift it onto the needle.
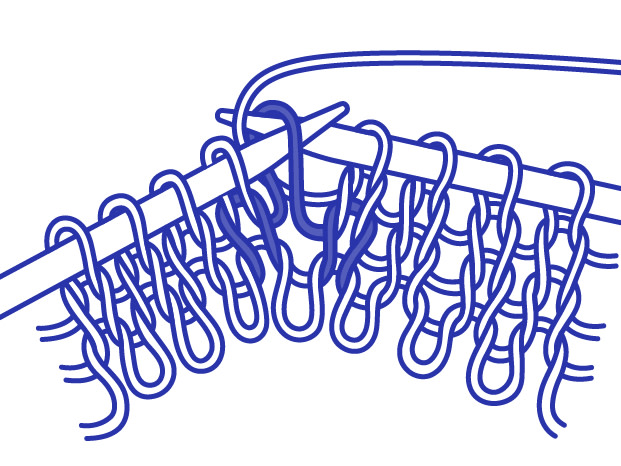
Insert the right-hand needle down through the back of the loop on the left-hand needle, wrap the yarn around the needle and pull through.
Slip the loop off the left-hand needle to complete the stitch.
Insert the left-hand needle from front to back, under the horizontal strand of yarn that lies between the stitches and lift it onto the needle.
Insert the right-hand needle down through the back of the loop on the left-hand needle, wrap the yarn around the needle and pull through.
Slip the loop off the left-hand needle to complete the stitch.
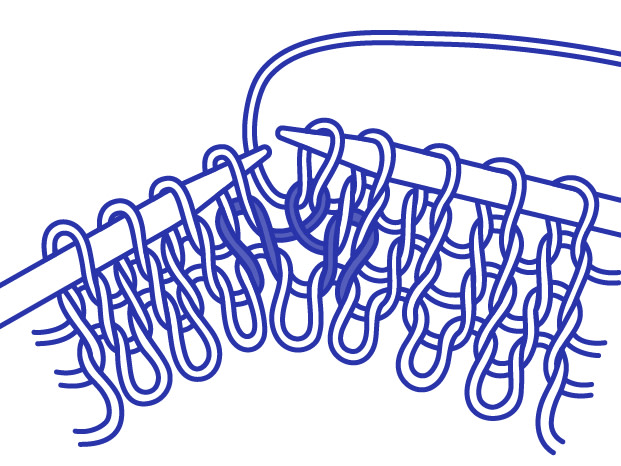
Knit 2 Stitches Together
Instead of knitting only one stitch at a time, knit two stitches together. Insert your right needle through the first two stitches on the left needle, then knit them together as a single stitch.
Instead of knitting only one stitch at a time, knit two stitches together. Insert your right needle through the first two stitches on the left needle, then knit them together as a single stitch.
Knit 2 Stitches Together Through the Back of the Loop

Insert your right needle through the first two stitches on the left needle, from right to left, with your right needle crossing behind your left needle, then knit them together as a single stitch.
Insert your right needle through the first two stitches on the left needle, from right to left, with your right needle crossing behind your left needle, then knit them together as a single stitch.
Purl 2 Stitches Together
Instead of purling only one stitch at a time, purl two stitches together. Insert your right needle through the first two stitches on the left needle, then purl them together as a single stitch.
Instead of purling only one stitch at a time, purl two stitches together. Insert your right needle through the first two stitches on the left needle, then purl them together as a single stitch.
Purl 3 Stitches Together
Instead of purling only one stitch at a time, purl three stitches together. Insert the right needle through the next three stitches and purl them together as if they were a single stitch.
Instead of purling only one stitch at a time, purl three stitches together. Insert the right needle through the next three stitches and purl them together as if they were a single stitch.

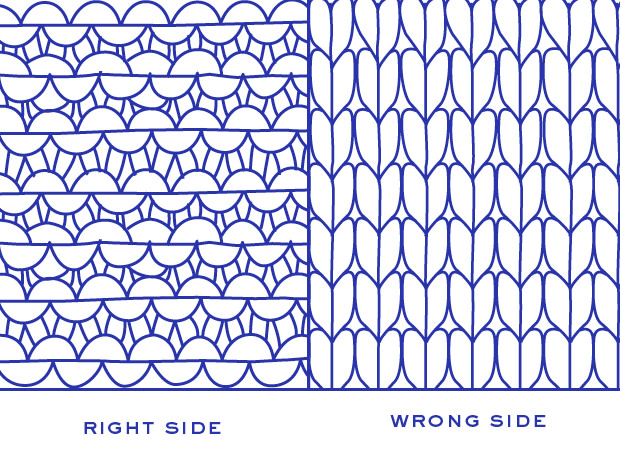
Simple stitch pattern where you alternate every knit and purl stitch on every row. For an odd number of stitches: knit one stitch, then purl one stitch, repeat to the end of the row and knit the last stitch. Repeat this row. For Knit stitches, you’ll be working with the yarn behind the the work. For Purl stitches, the yarn is in front of the work. Remember to always bring the yarn between the two needles when you need to move it between the front and the back.

Row 1: Knit. Row 2: Purl. Repeat these 2 rows.
Row 1: Knit. Row 2: Purl. Repeat these 2 rows.
Simple stitch pattern where you alternate every knit and purl stitch on every row. For an odd number of stitches: knit one stitch, then purl one stitch, repeat to the end of the row and knit the last stitch. Repeat this row. For Knit stitches, you’ll be working with the yarn behind the the work. For Purl stitches, the yarn is in front of the work. Remember to always bring the yarn between the two needles when you need to move it between the front and the back.
Row 1: Knit. Row 2: Purl. Repeat these 2 rows.
Row 1: Knit. Row 2: Purl. Repeat these 2 rows.
Row 1: [Knit 1, purl 1] repeat instructions within [square brackets] until the end of the row. Row 2: Purl. Repeat these 2 rows.
Row 1: Purl 1, [knit 2, purl 2] repeat instructions within [square brackets] to last 3 stitches, knit 2, purl 1. Row 2: Knit 1, [purl 2, knit 2] repeat instructions within [square brackets] to last 3 stitches, purl 2, knit 1. Repeat these 2 rows.
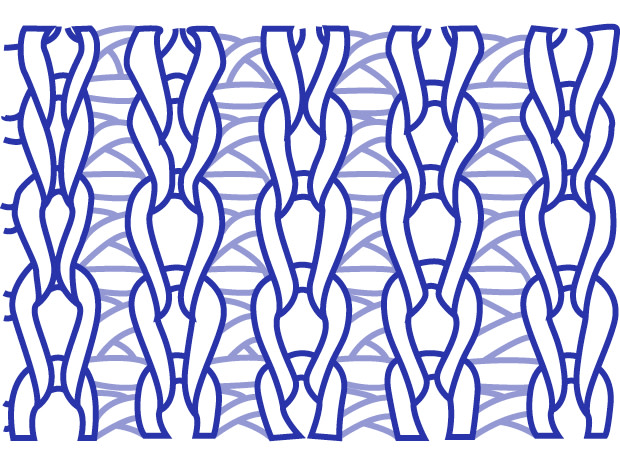
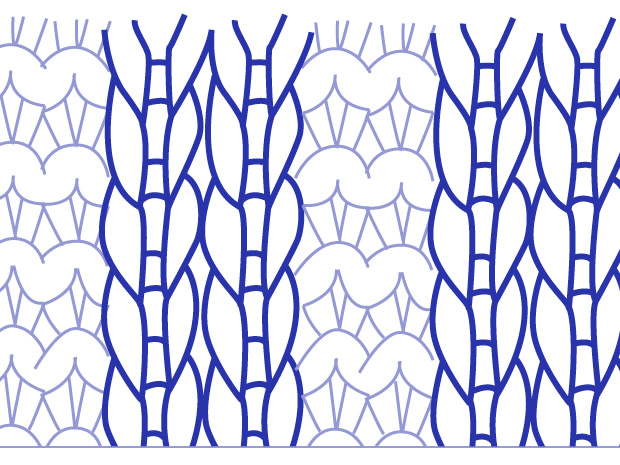
1x1 Rib Stitch
Rib Stitch is a stretchy stitch pattern created by alternating between knit and purl stitches.
With the yarn at the back, knit 1 stitch. Then bring the yarn forward, down between the needles. Purl 1 stitch. Take the yarn to the back, up between the needles. Continue alternating between knit and purl stitches to the end of the row, ending with a purl stitch. When you are working rib on an even number of stitches, every row is the same, starting with a knit stitch and ending with a purl stitch.
Repeat the following two rows. Row 1: With the yarn at the back, Knit 1 stitch. Bring the yarn forward, down between the needles and purl 1 stitch. Repeat these 2 stitches until you have 1 stitch left, knit the last stitch. Row 2: With the yarn at the front, Purl 1 stitch. Take the yarn to the back, up between the needles and knit 1 stitch. Repeat these 2 stitches until you have 1 stitch left, purl the last stitch.
Slipped Edge Stitch
To create neat edges, the pattern may tell you to Slip the first stitch of your rows. To Slip Knit-wise: holding the yarn behind the work (away from you), insert the right needle into the first stitch as if to Knit, and slip the stitch onto the right needle without knitting or purling out. Do the same to Slip Purl-wise, but instead hold the yarn in front of the work (towards you) and insert the needle as if to Purl.
Bobble Stitch
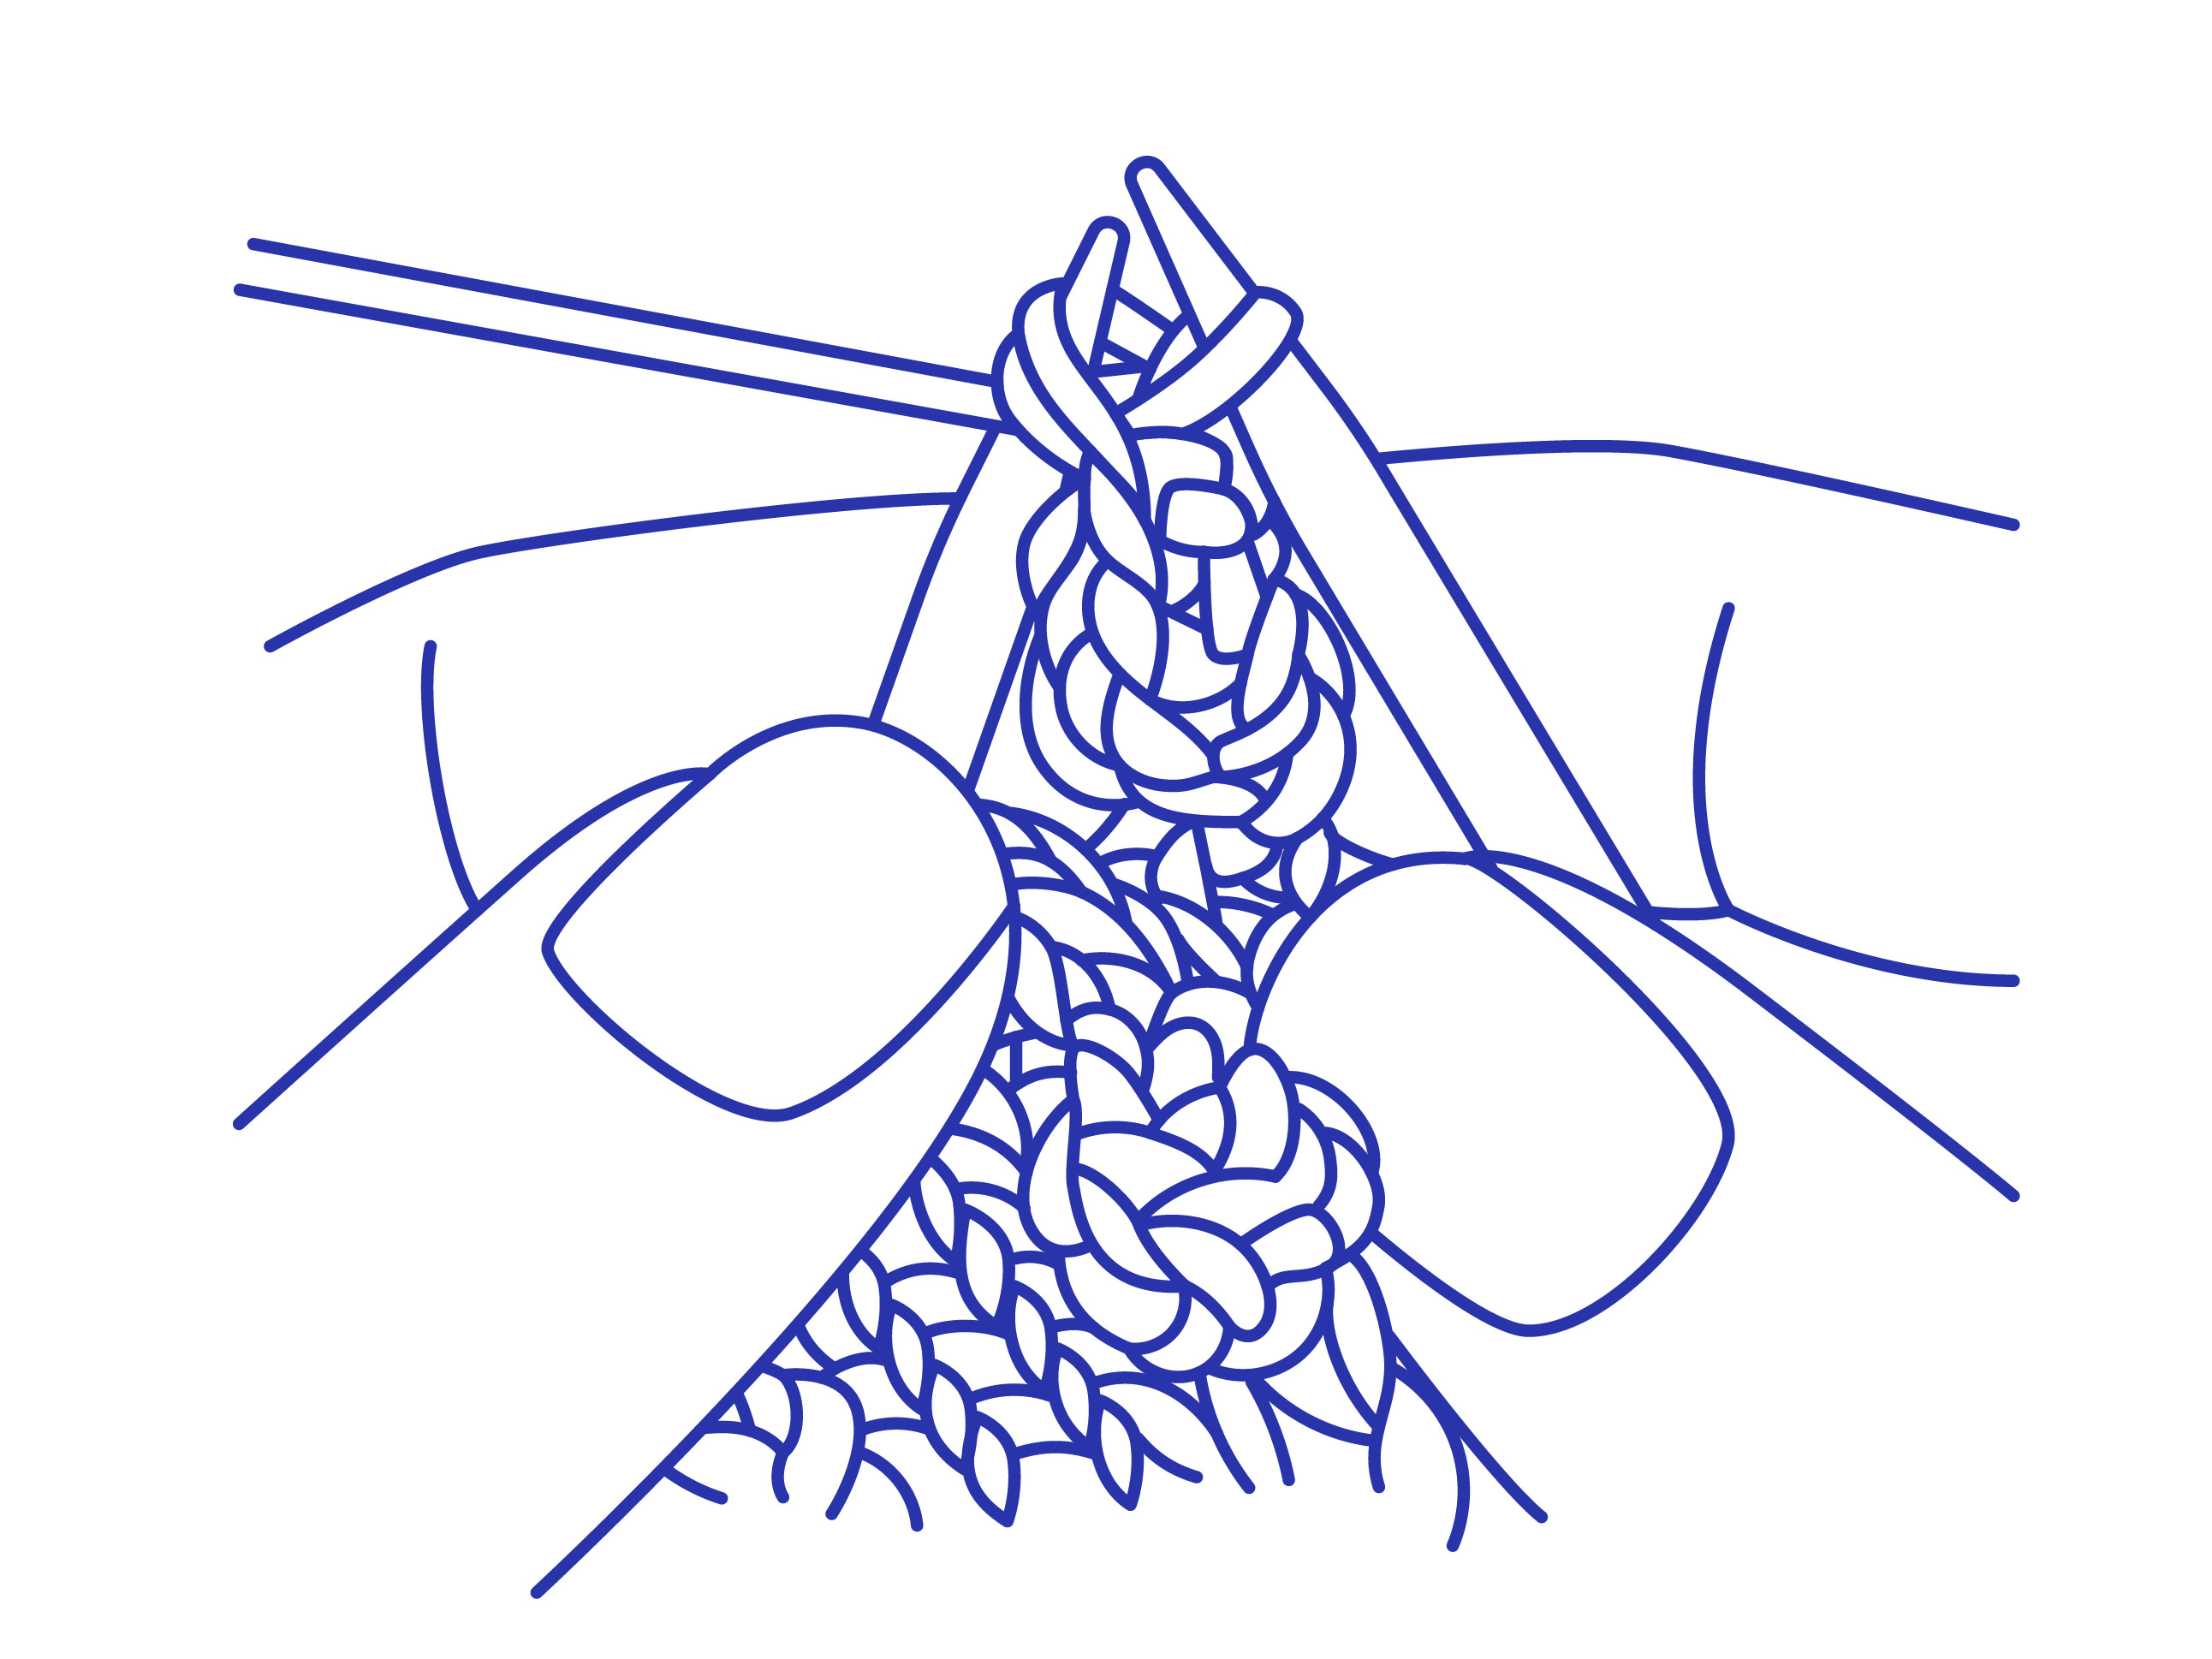
The instructions below make a small bobble. Your pattern may require a different number of increased stitches and rows.

To start, increase twice into the next stitch by knitting first into the front, then into the back and then into the front of the same stitch. (Creating three stitches where there was one originally).
Turn your work and purl back over these 3 stitches.
Turn your work again and knit 3 stitches.
To start, increase twice into the next stitch by knitting first into the front, then into the back and then into the front of the same stitch. (Creating three stitches where there was one originally).
Turn your work and purl back over these 3 stitches.
Turn your work again and knit 3 stitches.
Turn your work again and purl 3 stitches.
Turn your work once more, then work a central decrease across the 3 stitches by slipping the first two stitches knit wise. Knit one stitch. Then pass the two stitches you slipped over the one you just knitted. You have now completed your first bobble stitch.
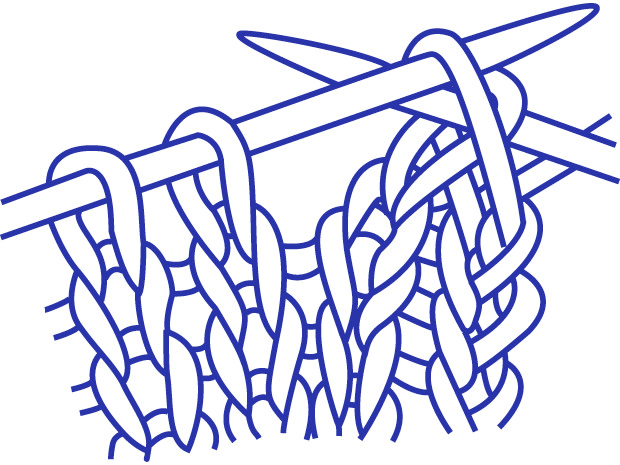
Slip Stitch
To slip a stitch, pass it from the left-hand needle to the right-hand needle without knitting or purling it. It can be slipped knit wise or purl wise.
To slip a stitch knitwise, hold the yarn at the back and insert the right-hand needle into the next stitch as if to knit. Slip the stitch onto the right-hand needle without knitting it.
To slip a stitch purlwise, hold the yarn at the front and insert the right-hand needle into the next stitch as if to purl. Slip the stitch onto the right-hand needle without purling it.
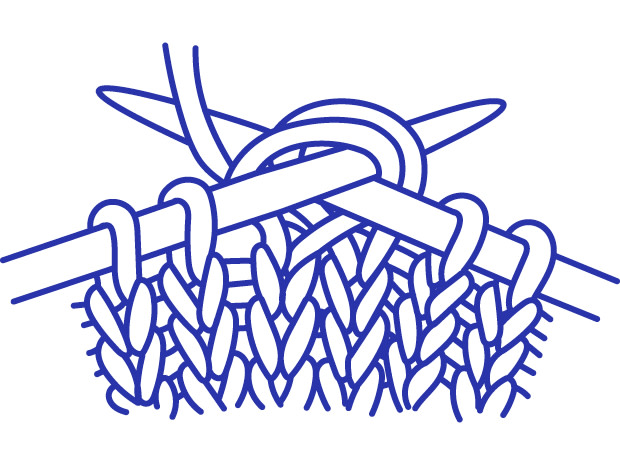
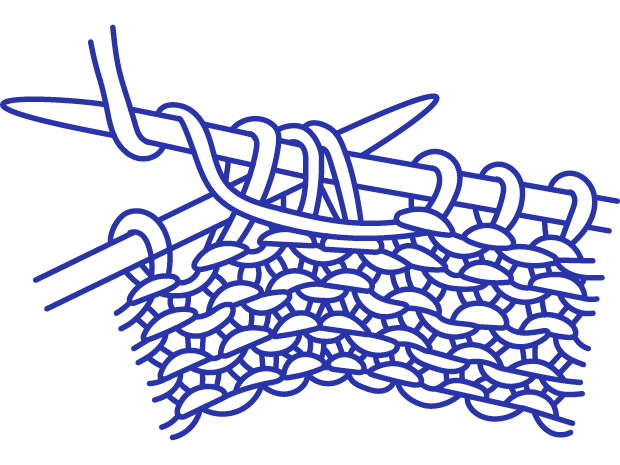
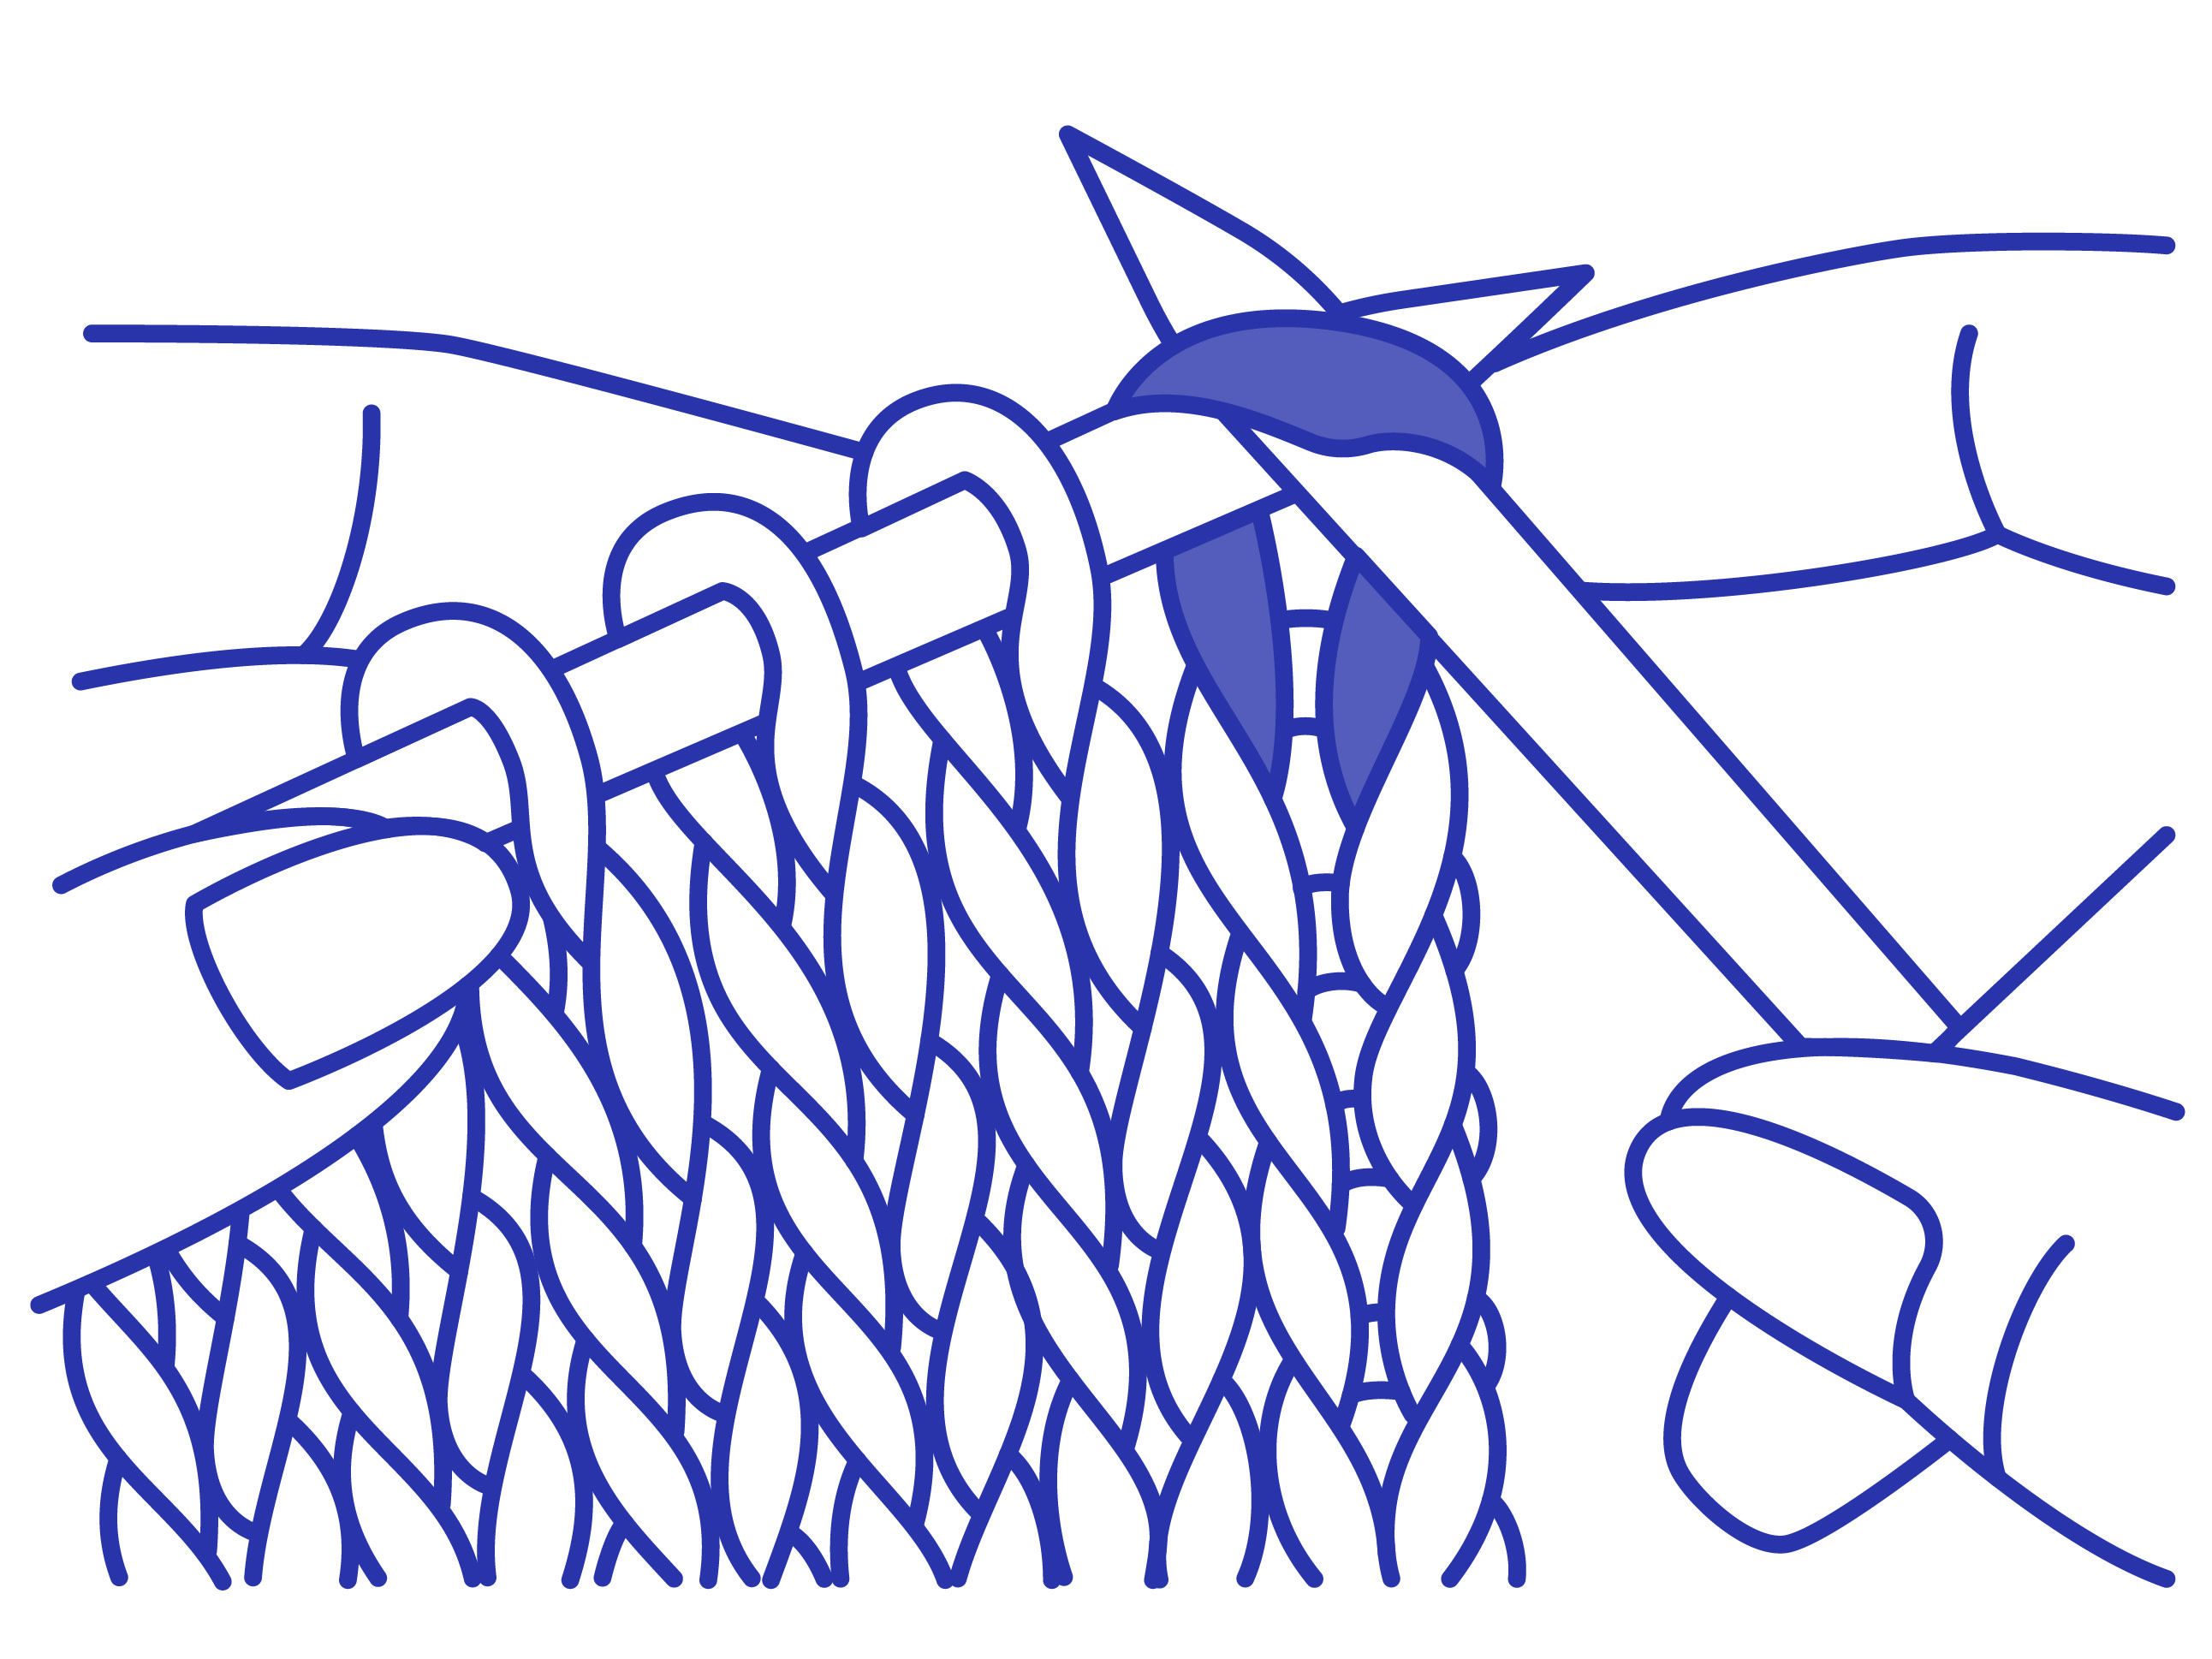
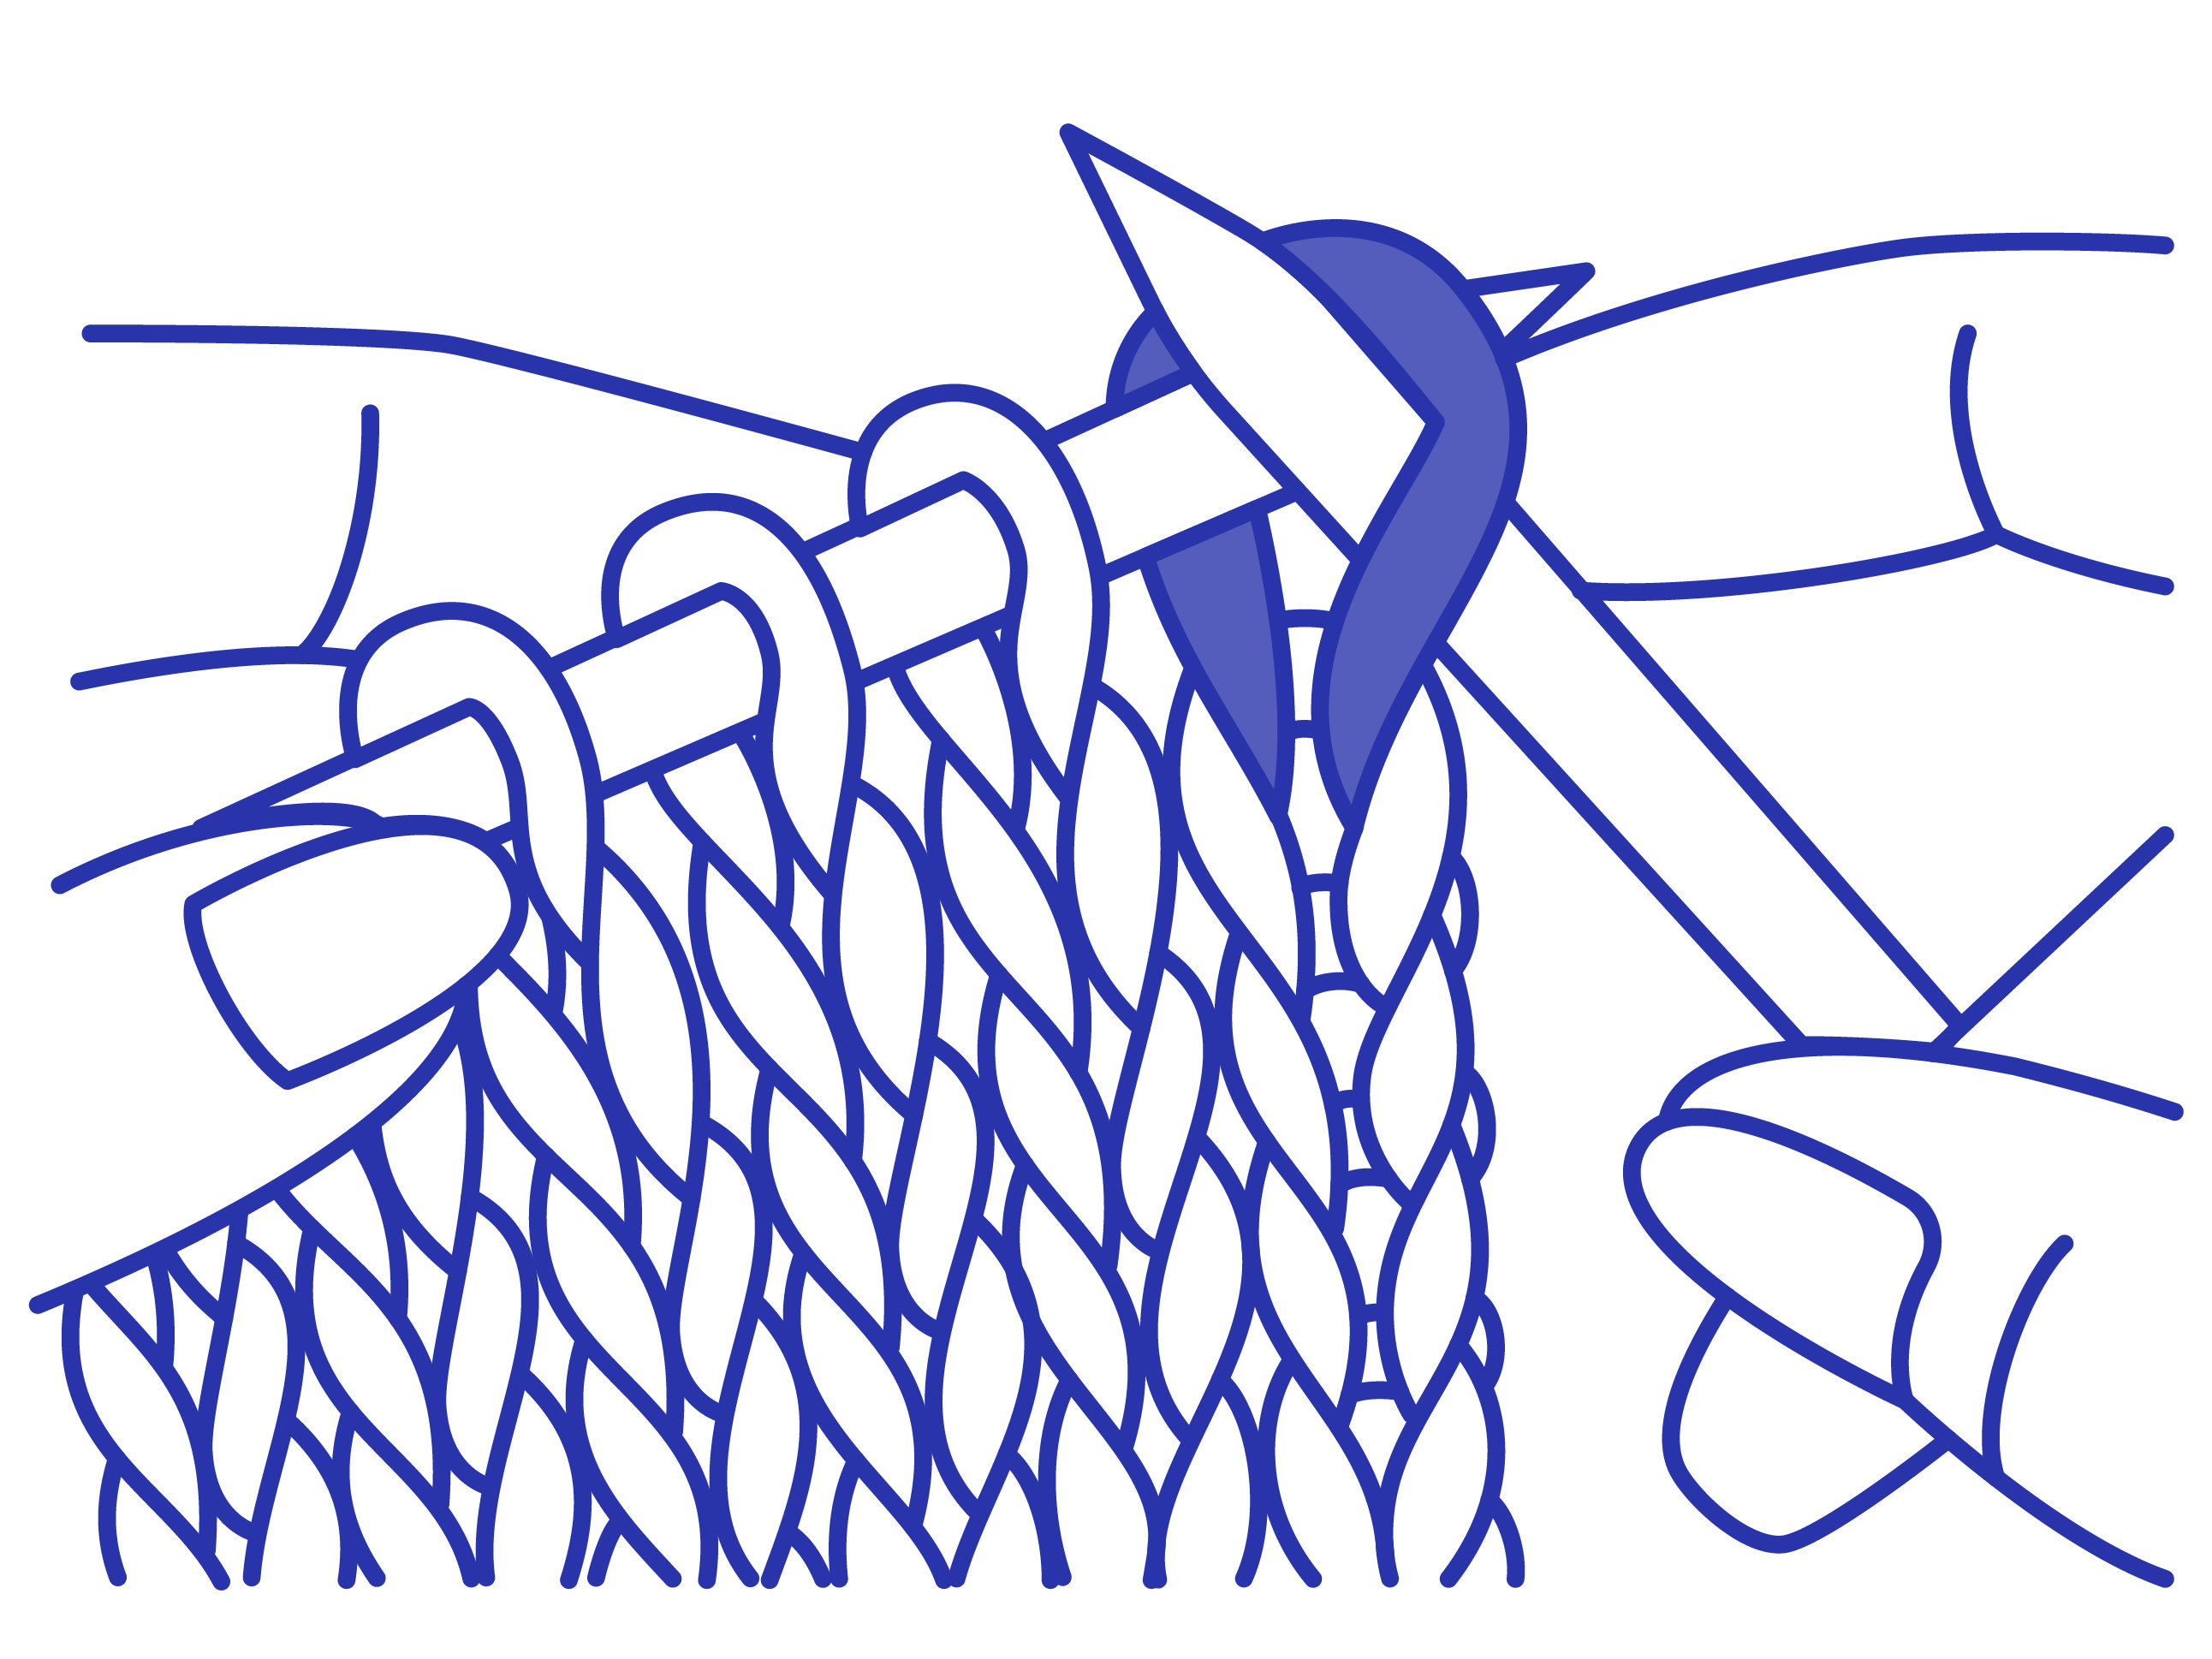
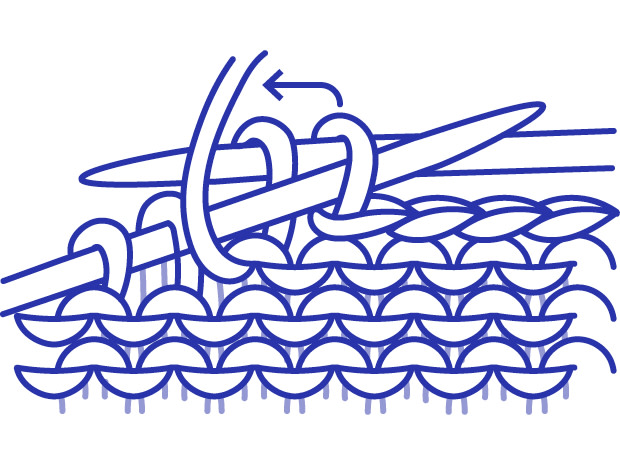
Cast Off
For your final row, knit the first two stitches. Using the tip of the left needle, lift the first stitch up and over the second stitch and the tip of the right needle. Now you will have only one stitch on your right needle. Knit one more stitch so you have two stitches on the right needle. Then repeat until you have one stitch left on the needle, remove needle.
Cut the yarn leaving a tail and pass the cut end of the yarn back through the loop of the last stitch, pull the yarn tight.
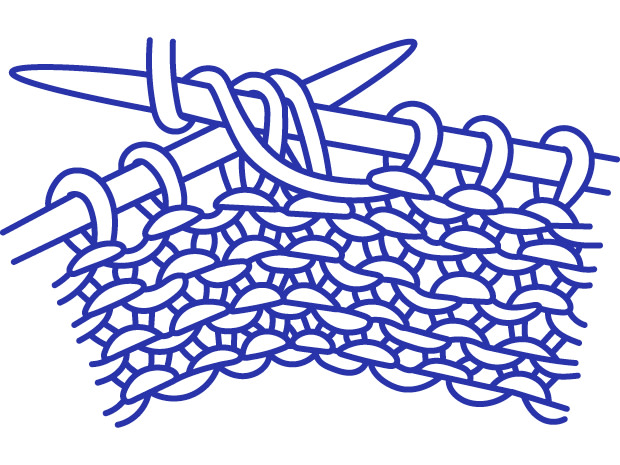
Cast Off Purl-wise
For your final row, purl the first two stitches. Using the tip of the left needle, lift the first stitch up and over the second stitch and the tip of the right needle. Now you will have only one stitch on your right needle. Purl one more stitch so you have two stitches on the right needle. Then repeat until you have one stitch left on the needle, remove needle.

Cut the yarn leaving a tail and pass the cut end of the yarn back through the loop of the last stitch, pull the yarn tight.
For your final row, purl the first two stitches. Using the tip of the left needle, lift the first stitch up and over the second stitch and the tip of the right needle. Now you will have only one stitch on your right needle. Purl one more stitch so you have two stitches on the right needle. Then repeat until you have one stitch left on the needle, remove needle.
Cut the yarn leaving a tail and pass the cut end of the yarn back through the loop of the last stitch, pull the yarn tight.
Vertical Invisible Seam
Also known as Mattress Stitch.
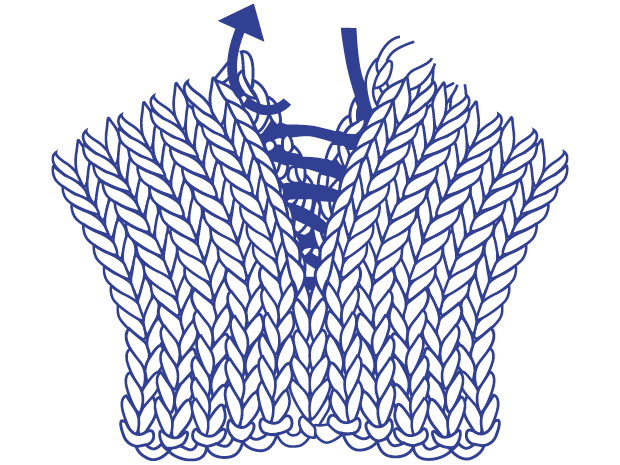
This technique is used to join the side edges of two pieces. Place the two knitted pieces side by side with the right sides up. Thread the sewing needle with 30 cm of yarn. Insert your sewing needle under the first horizontal bar between the first two stitches of the bottom row of the right-hand piece. Leave a short tail which you can weave in later. Pull the yarn through and insert the sewing needle through the opposite horizontal bar on the other piece. Sew back and forth through the horizontal bars moving all the way up the edges. To tighten the stitches, pull the yarn gently until your stitches are hidden.
This technique is used to join the side edges of two pieces. Place the two knitted pieces side by side with the right sides up. Thread the sewing needle with 30 cm of yarn. Insert your sewing needle under the first horizontal bar between the first two stitches of the bottom row of the right-hand piece. Leave a short tail which you can weave in later. Pull the yarn through and insert the sewing needle through the opposite horizontal bar on the other piece. Sew back and forth through the horizontal bars moving all the way up the edges. To tighten the stitches, pull the yarn gently until your stitches are hidden.
Oversew Stitch
This is a simple way of joining a cast on and a cast-off edge together.
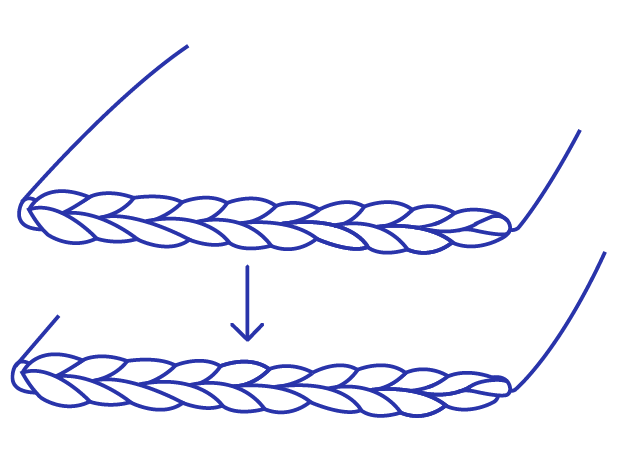
Place the two pieces you want to join with right sides together, lining up to the two edges.
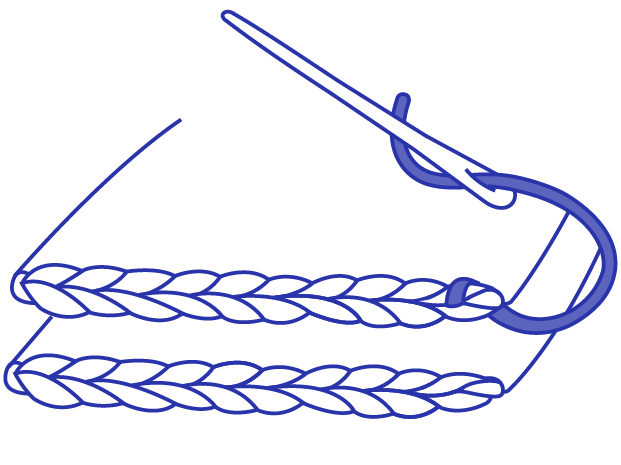
Thread your sewing needle with a strand of yarn and secure it to the wrong side of the fabric.

Insert the sewing needle through the first stitch of the piece facing you. Push it through both pieces so it comes out through the first stitch on the wrong side of the second edge. Wrap the yarn over the seam and insert your needle into the second stitch of the piece facing you. Repeat until you have joined the whole edge.
Place the two pieces you want to join with right sides together, lining up to the two edges.
Thread your sewing needle with a strand of yarn and secure it to the wrong side of the fabric.
Insert the sewing needle through the first stitch of the piece facing you. Push it through both pieces so it comes out through the first stitch on the wrong side of the second edge. Wrap the yarn over the seam and insert your needle into the second stitch of the piece facing you. Repeat until you have joined the whole edge.
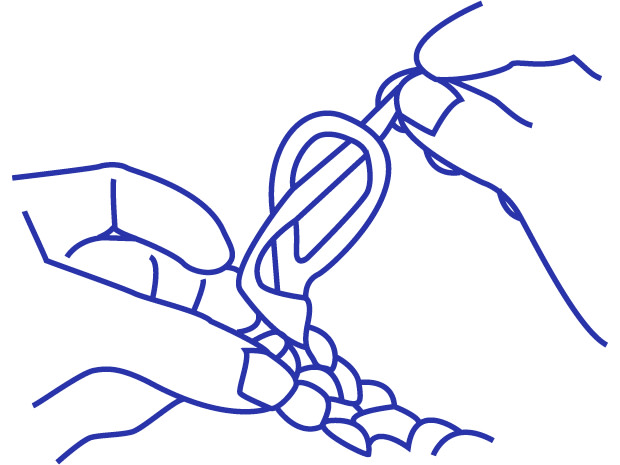
Weave in Ends
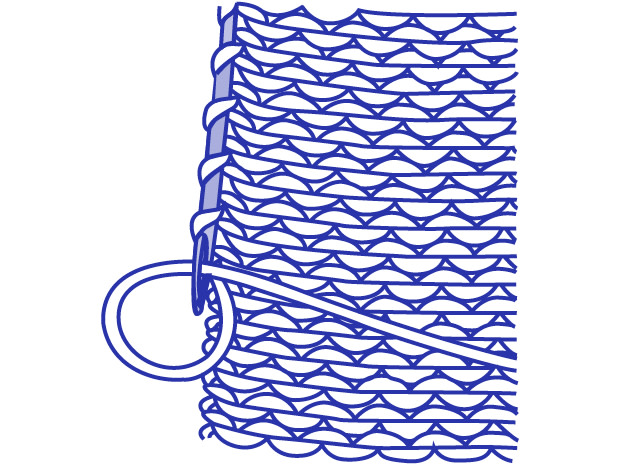
Weave the ends of your yarn into your knitting to finish it off and stop it from unravelling. Thread the tail onto the small sewing needle. Weave the yarn along the edge of your knitting as shown in the diagram. Where you have started a new ball, weave one tail in one direction and the other tail in the opposite direction. Once you have weaved in approximately 15 cm / 6 in then cut the tail.
Weave the ends of your yarn into your knitting to finish it off and stop it from unravelling. Thread the tail onto the small sewing needle. Weave the yarn along the edge of your knitting as shown in the diagram. Where you have started a new ball, weave one tail in one direction and the other tail in the opposite direction. Once you have weaved in approximately 15 cm / 6 in then cut the tail.